How to Install the
Slimline 50 Under Eave
Suitable for builders, awning contractors and confident DIY installers
This guide covers everything you need to install your under eave awning Sydney correctly. The Slimline 50 under eave awning mounts to the wall below the eave — the arm travels under the overhang to the fascia line where the panel sits. Three fixing points: wall bracket to wall, rear rail to fascia, front rail to arm tongue. For NSW installation requirements visit NSW Fair Trading.
Understanding your Slimline 50 under eave awning system
The Slimline 50 Under Eave uses a wall bracket and arm system. The wall bracket fixes to the wall below the eave. The arm then travels horizontally under the eave overhang and projects outward to the fascia line — this is where the awning panel begins.
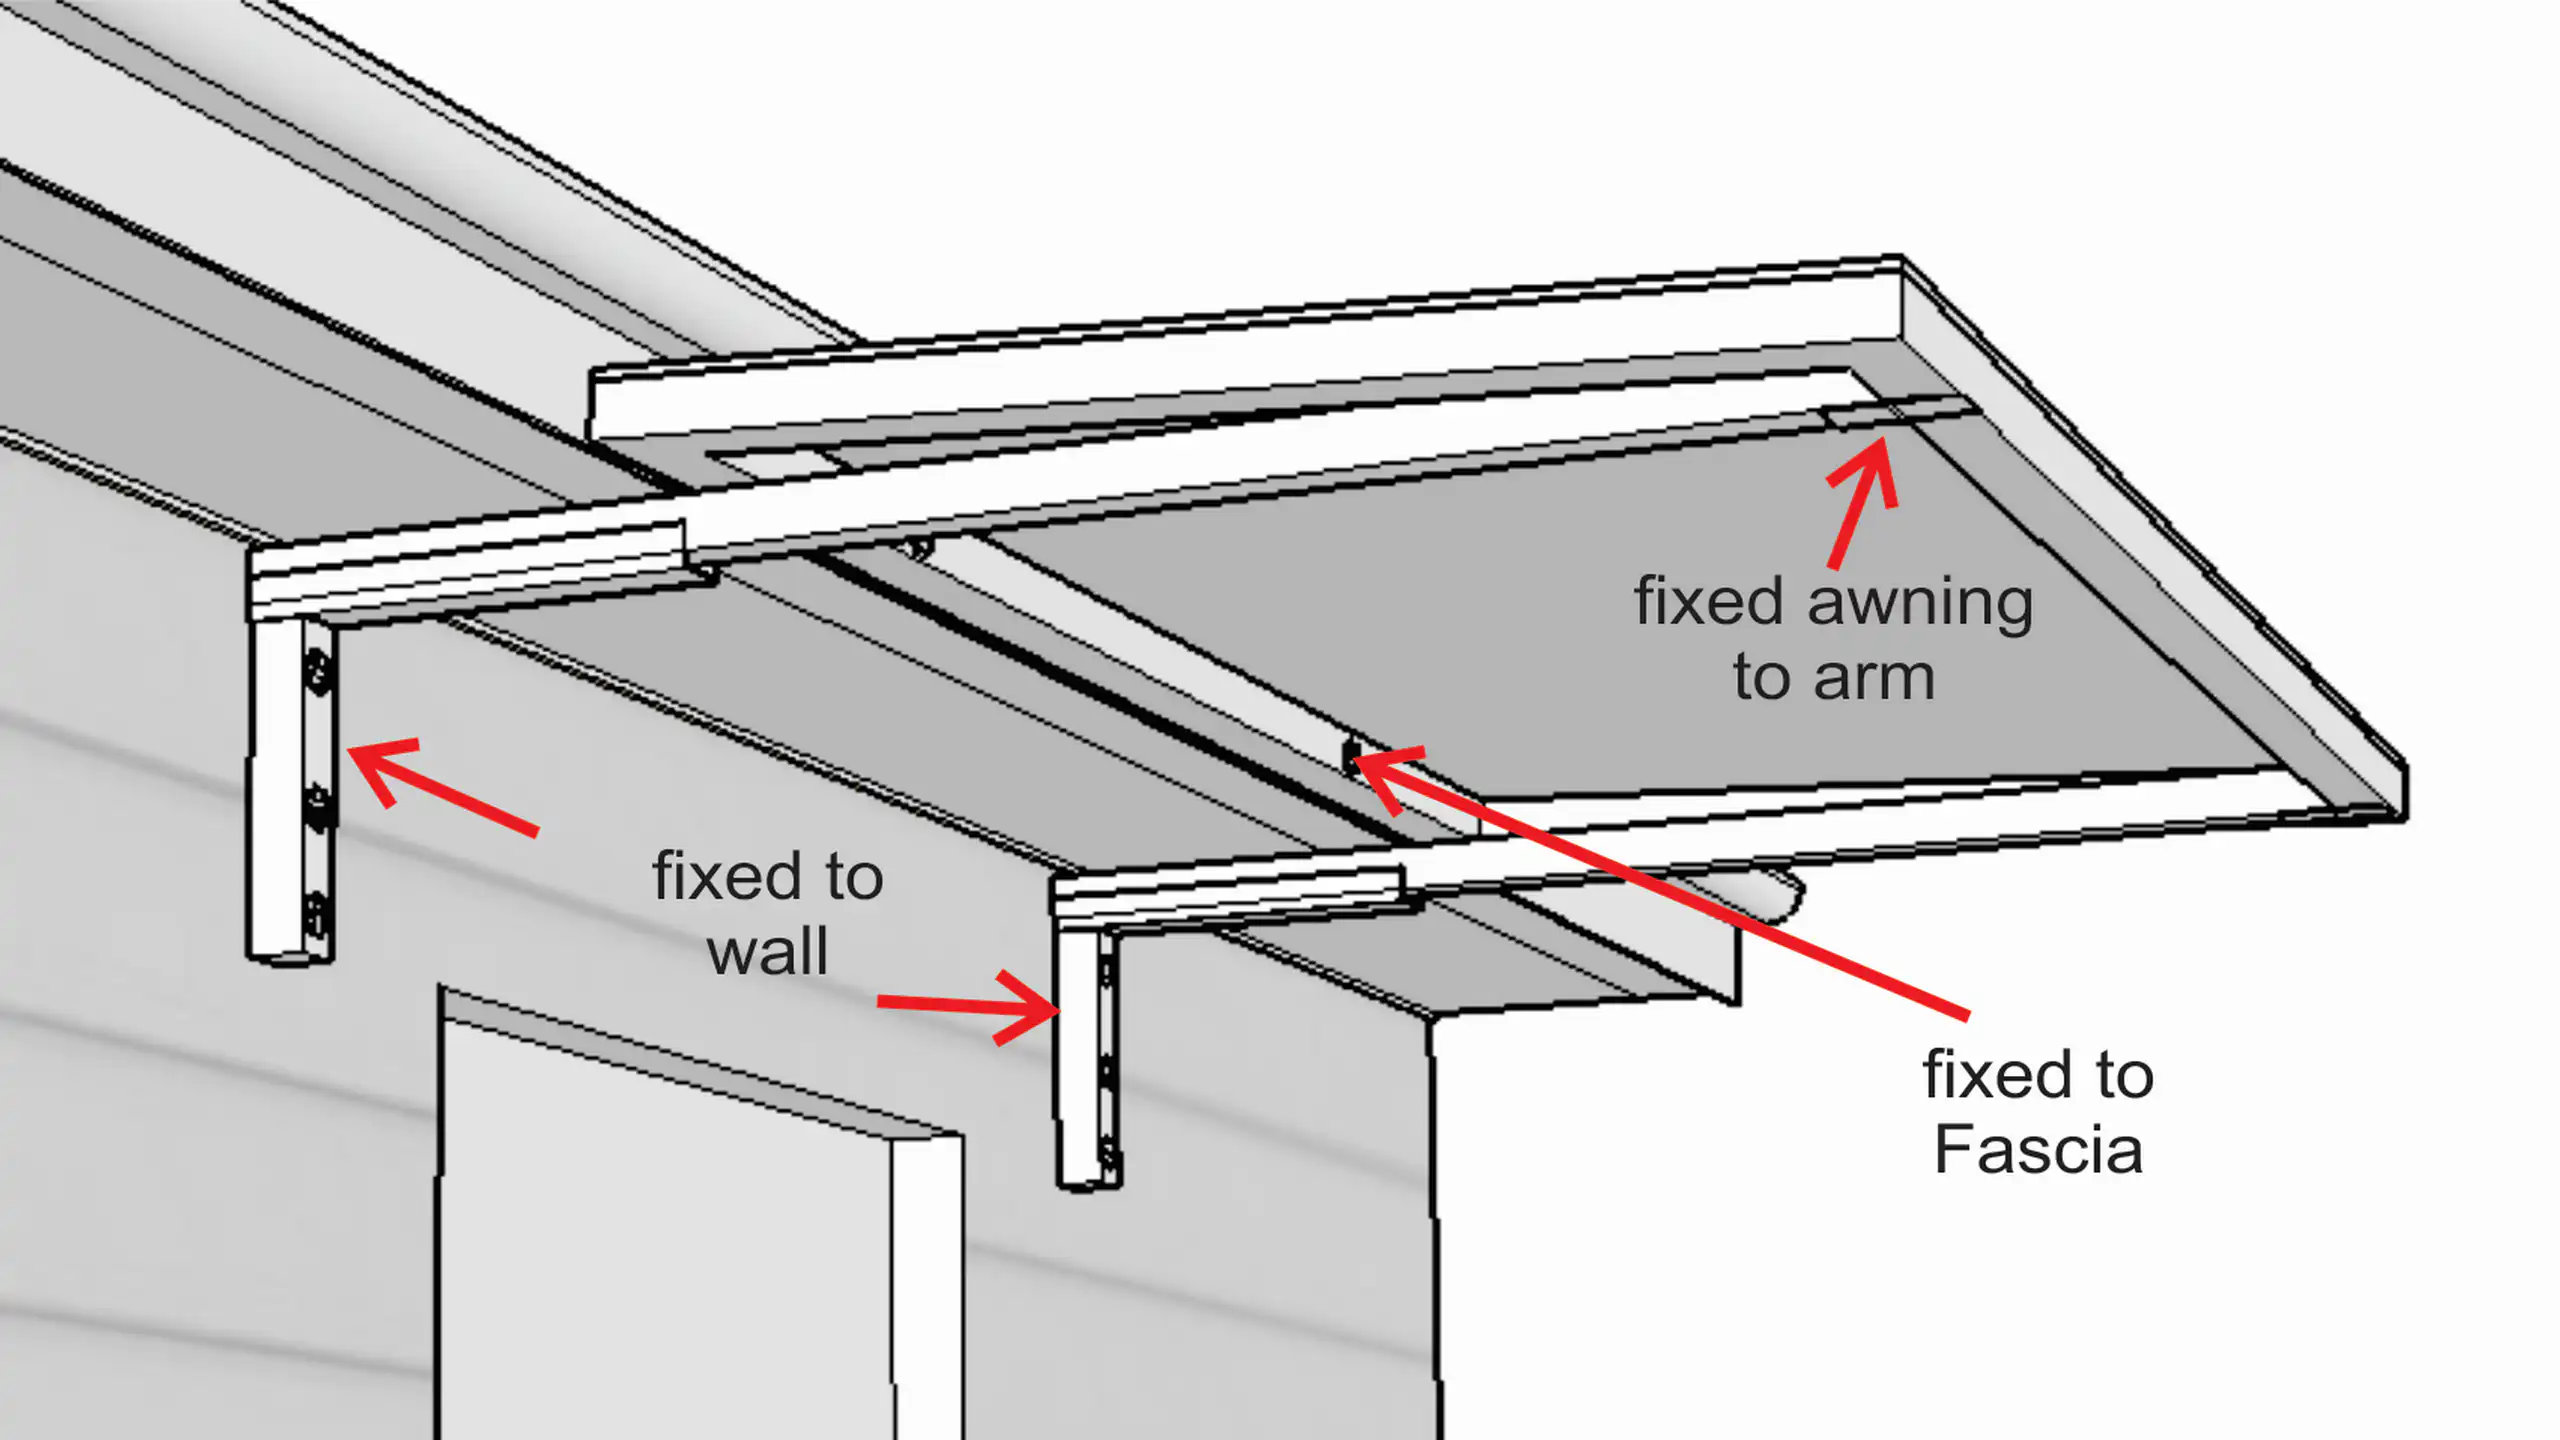
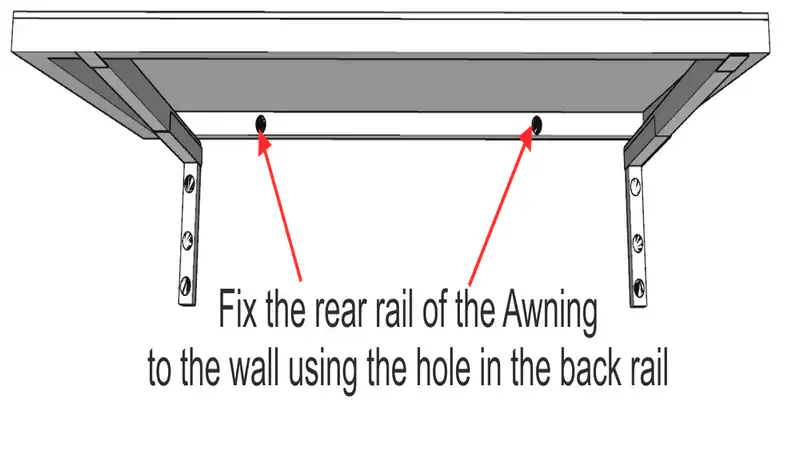
There are three fixing points as shown in the diagram:
- Fixed to wall — the wall bracket screws to the wall through the timber studs behind the cladding.
- Fixed to fascia — the rear rail of the awning panel screws to the fascia board at the front of the eave.
- Fixed awning to arm — the front rail of the awning panel seats onto the tongue at the front of the arm and is secured with a Tek screw.
Under eave awning bracket and arm parts explained
The wall bracket
The wall bracket is the component that fixes to the wall. It has a vertical plate with 3 fixing holes — these are where the structural screws go through the cladding and into the timber stud behind it.
At the top of the bracket is a U-channel — this is where the rear end of the arm slots in and is locked with 4 Tek screws, 2 on each side of the channel.
Assemble the arm into the bracket on the ground before lifting to the wall — much easier than working at height.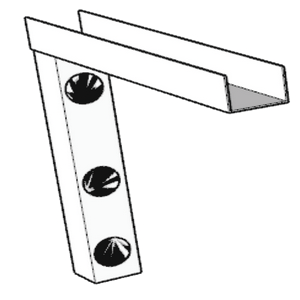
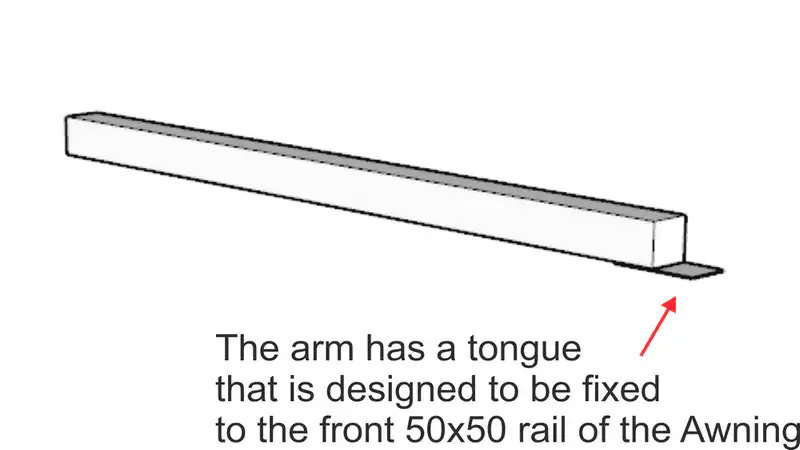
The arm
The arm is a 50×50mm aluminium section. The rear end slots into the U-channel of the wall bracket. The front end has a tongue — this is the tab that seats up into the front rail of the awning panel and is secured with a Tek screw.
- Rear end — into the wall bracket U-channel, locked with 4 Tek screws.
- Front end — tongue seats into the front 50×50 rail of the awning panel.
How to fix your under eave awning brackets to the wall
First assemble the arm into the wall bracket on the ground:
- Slide the rear end of the arm into the U-channel of the wall bracket.
- Lock it firmly by driving 4 Tek screws — 2 on each side of the channel.
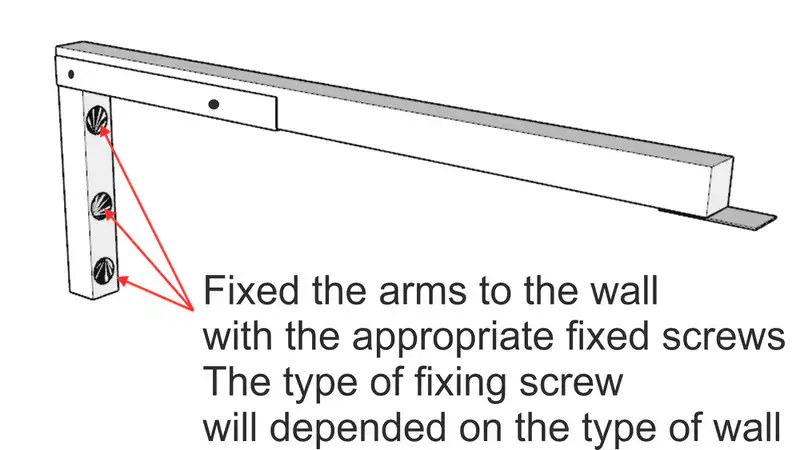
Fixing the assembled bracket to the wall
With the arm locked into the bracket, fix the assembled unit to the wall:
- Hold the assembled bracket and arm against the wall. Push the arm hard up against the underside of the eave before drilling anything.
- Mark the 3 fixing hole positions through the wall bracket onto the wall.
- Drill and plug the wall as appropriate for your wall type.
- Fix the bracket to the wall with the appropriate screws — structural screws into studs for cladded walls, masonry bolts for brick or concrete.
- Check level before tightening fully.
Wall fixing types and final checks
How to fit the awning panel onto the arms
With all brackets and arms fixed to the wall, lift the awning panel into position on top of the arms.
- Lower the awning panel down so the front 50×50 rail seats onto the tongue at the front of each arm.
- The rear rail should sit flat against the fascia board at the back.
- Make sure the front rail is fully and evenly seated on every arm tongue before driving any screws.
How to fix the awning panel to the fascia and arms
Fix the awning panel in place from both ends:
- Rear rail to fascia — the rear rail has pre-drilled holes. Mark through these holes onto the fascia, drill and plug if needed, then fix the rear rail firmly to the fascia board.
- Front rail to arm tongue — drive a Tek screw down through the front rail into the tongue on each arm to lock the front of the panel in place.
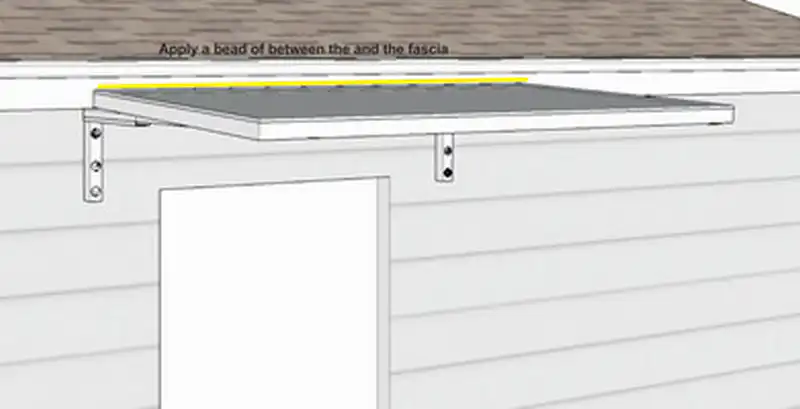
How to seal the awning
Apply a continuous bead of exterior-grade silicone along the joint between the rear rail and the fascia, and along any joint between the side frames and the wall where water could enter.
- Apply in one continuous bead — no gaps.
- Tool smooth with a wet finger or silicone tool.
- Allow to fully cure before exposure to rain.
You do not need to be a tradesperson to install your under eave awning. If you are comfortable using a drill, working at height on a ladder, and using a spirit level there should be no problems.
Assembling the arms on the ground before lifting makes the job much more manageable. Two people is recommended for lifting the awning panel into position.
Custom-made in Sydney — supply your measurements and we'll build it ready to fit.
Get a Quote or call 0405 533 839 Back to Slimline 50 Under Eave